使用Travis CI自动构建Hexo静态博客
热度 °
目前,自动化构建、持续集成的理念在整个计算行业非常的流行,大家更愿意去使用自动化代替手动,从而提高效率。Travis CI就是一个在线的、分布式的持续集成服务,用来构建及测试在GitHub托管的代码。利用Travis CI 会在每一次push后生成一个虚拟机来执行事先安排好的自动构建任务,从来进行发布。本文就要用Travis CI来自动构建Hexo博客。
安装Hexo
- 安装cnpm
注意:npm因为qiang的原因,经常会出问题,我换成了taobao的cmpn镜像,taobao的cnpm镜像这是一个完整 npmjs.org 镜像,你可以用此代替官方版本(只读),同步频率目前为 10分钟 一次以保证尽量与官方服务同步。
安装命令1
$ npm install -g cnpm --registry=https://registry.npm.taobao.org
- 安装Hexo
1 | $ cnpm install hexo-cli -g |
启动本地的服务器看下是否安装成功hexo s,浏览器打开http://localhost:4000。
到目前为止,Hexo安装完毕,如何配置及发布到github上托管,请参考用Hexo+github搭建本站。本文重点记录如何用Travis CI 自动构建Hexo博客。
部署Travis CI
目前,自动化构建、持续集成的理念在整个计算行业非常的流行,大家更愿意去使用自动化代替手动,从而提高效率。
- 持续集成的概念
持续集成是一种软件开发实践。在持续集成中,团队成员频繁集成他们的工作成果,每人每天可能集成一次,甚至多次。每次集成会经过自动构建(包括自动测试)的检验,以尽快发现集成错误。许多团队发现这种方法可以显著减少集成引起的问题,并可以加快团队合作软件开发的速度。
自动构建工具则是持续集成的一种出色实践。代码提交后,由软件自动完成代码的测试、构建,并将过程中状态与构建物产出才是持续集成的意义。
- 为什么使用
Travis CI本身已经是很好的自动构建的工具,而这里使用的原因,本质上是因为Hexo本身并不能进行多人合作。Hexo的hexo generate和hexo deploy会自动渲染并提交到GitHub上,所以当你从别的电脑上clone的时候,clone下来的是渲染好的html的文章。就算我在两个电脑上同时搭建了环境,但是每次渲染的时候只会渲染本地的markdown文章,依然不能进行同步。有些人选择了使用百度云进行同步,每次写之前下载下来并覆盖,就能进行同步。不否认,这个方法对于一个人写博客,在工作和家的电脑还算是比较方便的,因为始终是一个人进行操作。而我们的博客是多人共同写的,所以说会存在各种冲突问题,于是想到了用Travis CI。
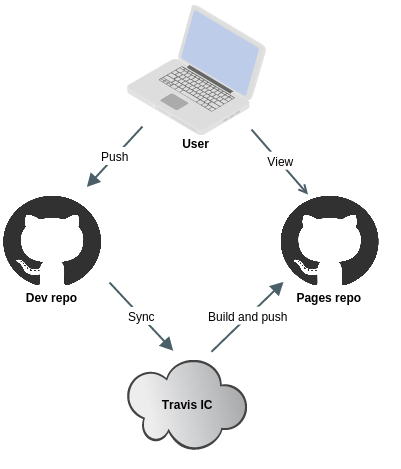
从上述流程中分析下思路:
前提:我们在之前博客搭建的repo下面,新建一个blog的分支,这个分支用来进行环境代码的备份,并且配置出.travis.yml进行自动化构建。
1 | User - push -> branch blog |
将代码push到在GitHub上的博客中的blog分支。
1 | Dev repo - sync -> Travis CI |
在branch blog中配置.travis.yml文件,在Travis CI中开启branch blog的同步开关,并启用Build only if .travis.yml is present项,这样能在repo中有多个branch时,让Travis CI只构建放置了.travis.yml文件的branch。
- Travis CI - build and push -> Pages repo
Travis CI 的自动化构建完全依靠唯一的.travis.yml脚本文件。需要在此文件中添加构建环境、构建Hexo、生成博客及后续push到Pages repo的全部脚本。
- 生成SSH Key
要做到Travis CI向Pages repo自动推送就必须用到Github SSH Key,这样做的目的是免去Hexo部署时候输入密码的步骤。生成SSH Key的操作参照GitHub的官网即可:Github SSH Key。
这样会得到id_rsa.pub和id_rsa两个秘钥,我们将id_rsa.pub添加到了github,下面要加密id_rsa这个私钥并且上传到Travis。
注意: 这个SSH key不应该是你账号的全局SSH Key,这样Travis CI就获得了你所有代码库的提交权限。仅仅只需要把SSH Key添加到当前repo的setting中的key下面即可。
即将id_rsa.pub秘钥添加到当前项目researchlab.github.io下Settings下的Deploy keys中,如图:
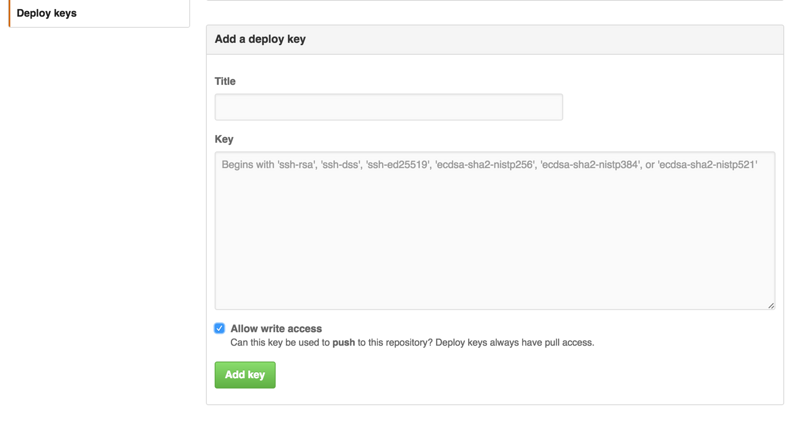
记得要将
Allow write access的选项选上,这样 Travis CI 才能获得 push 代码的权限。
- Travis CI 环境注意:
1
2
3
4
5$ sudo cp ~/.ssh/id_rsa / #将上一步得到的`id_rsa`复制到当前blog根目录下
$ vim .travis.yml #创建.travis.yml
$ gem install travis #安装Travis CI
$ travis login --auto #登录Travis CI,需要输入GitHub的账号密码
$ travis encrypt-file ssh_key --add #加密私钥并上传至Travis 注意这里的 ssh_key 要换成上面私钥的名称,即: travis encrypt-file id_rsa
gem 的官方源经常被qiang, 所以要注意更换gem sources,1
2
3
4gem sources #查看原有的官方源
gem source -r https://rubygems.org/ # 删除 rubygems 官方源
gem source -a http://mirrors.aliyun.com/rubygems/ # 添加aliyun 源
gem install travis --no-rdoc --no-ri --verbose # 安装Travis
生成提示
1 | encrypting id_rsa for researchlab/researchlab.github.io |
生成加密过得新秘钥id_rsa.enc, 并自动将branch blog中git的信息及解密秘钥的相关信息添加到.travis.yml中。 然后手动删除私钥文件id_rsa, 以保证代码仓库的安全。
- SSH的设置
在当前目录下新建文件ssh_config,内容为
1 | Host github.com |
修改.travis.yml中的命令,指定openssl解密后的生成位置,xxxxxxxxxx部分就是你的解密参数,不要去改动它。
即将1
2- openssl aes-256-cbc -K $encrypted_xxxxxxxxxx_key -iv $encrypted_xxxxxxxxxx_iv
-in id_rsa.enc -out id_rsa -d
修改为:
1 | - openssl aes-256-cbc -K $encrypted_xxxxxxxxxx_key -iv $encrypted_xxxxxxxxxx_iv |
- 修改目录权限
紧接着在.travis.yml中修改目录权限
1 | - chmod 600 ~/.ssh/id_rsa |
- 将密钥加入系统
紧接着在.travis.yml中将密钥加入系统
1 | - eval $(ssh-agent) |
- 修改git信息
1 | - cp ssh_config ~/.ssh/config |
- 添加分支信息
1 | branches: |
- 配置Hexo
1 | install: |
这样就完成了.travis.yml的设置,这里是我的源文件.travis.yml。
1 | language: node_js |
这个时候应该将其push到blog分支,然后就可以了。
遇到Authentication failed
提交之后,发现Travis-ci 每次到hexo d 这一步时就报错了:
1 | remote: Invalid username or password. |
这是因为hexo 根目录下的 _config.yml中配置问题导致的:
把如下配置:
1 | # Deployment |
修改为:
1 | # Deployment |
问题即解决!

作者署名:朴实的一线攻城狮
本文标题:使用Travis CI自动构建Hexo静态博客
本文出处:http://researchlab.github.io/2016/05/08/travis-ci-deploy-hexo-blog/
版权声明:本文由Lee Hong创作和发表,采用署名(BY)-非商业性使用(NC)-相同方式共享(SA)国际许可协议进行许可,转载请注明作者及出处, 否则保留追究法律责任的权利。

